
Tools
Paint S provides a variety of tools and built-in shapes to help you create and edit images.
Select and Configure Tools
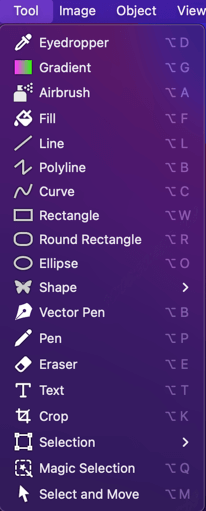
You can select a tool in two ways:
- Toolbar: Click a tool icon in the Toolbar.

- Tool Menu: Choose a tool from the Tool menu. Many tools have keyboard shortcuts for quick access.
After selecting a tool, you can configure its properties (such as line width or color) in the Attributes Panel. See Modify Attributes.
Tips
You can also draw first and modify the object's attributes later.
Eyedropper Tool
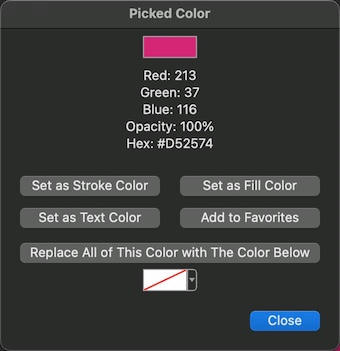
Use the Eyedropper to sample a color from your image. Hover over the canvas to preview the color, then click to select it. A panel will appear with options to:
- Set it as the stroke or border color.
- Set it as the fill color.
- Set it as the text color.
- Add it to your favorite colors.
- Replace the sampled color with another color throughout the image.
Tips
Sample a solid background color and replace it with the transparent color to quickly remove the background.
Gradient Tool
Add a rectangular gradient to the canvas. Configure the gradient in the Attributes panel, then click and drag on the canvas to draw it.
Tips
To apply a gradient to other shapes (like circles or stars), draw the shape first, then set its Fill attribute to a gradient.
Airbrush Tool
Simulate painting with an airbrush. Click and drag to spray color. The longer you hold the brush in one spot, the denser the paint becomes. Adjust the color and spray radius in the Attributes panel.
Fill Tool
Fill an area with a solid color. Click to fill adjacent pixels of the same color. Alternatively, click and drag to adjust the tolerance—dragging further fills a wider range of similar colors.
Line Tool
Draw straight lines. Click and drag, or click two points to create a line. Use the control knobs at each end to adjust its length and angle. You can customize the line's color, width, dash style, and add arrowheads in the Attributes panel.
Tips
Hold Shift while drawing to constrain the line to horizontal, vertical, or 45-degree angles.
Polyline Tool
Draw a shape composed of multiple straight line segments. Click to add each point. Double-click or right-click to finish the shape. Drag the control knobs to adjust individual points.
Tips
Hold Option (⌥) while adding a point to create a curved segment.
Curve Tool
Draw smooth, curved lines. It works similarly to the Line tool, but creates a curve between the points.
Rectangle Tool
Draw rectangles and squares. Click and drag to define the size, or click once to add a default rectangle. Use the control knobs to resize it.
Tips
Hold Shift while drawing to constrain the shape to a perfect square.
Rounded Rectangle Tool
Draw rectangles with rounded corners. It includes an additional control knob to adjust the corner radius directly on the canvas.
Tips
Hold Shift while adjusting the corner radius to make it perfectly circular.
Ellipse Tool
Draw ellipses and circles. It works exactly like the Rectangle tool.
Tips
Hold Shift while drawing to constrain the shape to a perfect circle.
Shape Tool
Paint S includes a library of built-in shapes (arrows, stars, hearts, speech bubbles, and more).
To select a shape:
- Click and hold the Shape tool icon in the Toolbar to reveal the shape menu.
- Select the Shape tool, then click the shape button in the Attributes panel.
- Choose Tool > Shape from the menu bar.
Draw and adjust these shapes just like you would a rectangle.
Pen Tool
Create precise custom paths, curves, and shapes using vector points.
- Straight Lines: Click to add anchor points.
- Curves: Click and drag to create a curved segment with direction handles.
- Finish Path: Double-click, right-click, or press
Escto complete the path.
If you want to use it as the broken line tool, you can just click on the canvas and move to another point and then click and move to another point. You can double-click or right-click to end when you want. At this time, a new broken line will be added.
To convert a path to a shape, you can select it and then right-click it to show the context menu. Then you can choose Close Path to make it a shape.
You can click an existing point control knob on the canvas to select it. Then you can click the delete key on your keyboard to delete it.
You can also double click some position on the path to add a new point onto it.
Pen tool
You can use the pen tool to draw a freedom line just as sketching on a paper with a pencil.
You can also use it to pixel paint. In addition to the line attributes, the pen tool has one more attribute: the shape of the pen. There are two shapes: square and round. You shoud use the square shape when pixel painting.
To use this tool, you can just click on the canvas and then drag to draw and release your clicking to stop drawing.
Tips
If you want to sketch continuously, not stop when releasing your clicking, you can press the shift key on your keyboard while drawing. Then you can move to another point and click again to draw.
Info
Your draw will be smoothed when using this tool. If you don't want this, you can presss the option key on your keyboard while drawing.
Eraser tool
This tool helps you to erase some part of the image.
You can use it just as the pen tool.
Text tool
The text tool helps you to add some texts on the canvas.
In addition to all the attributes of a shape, such as border attributes, fill attributes and so on, the texts has some more attributes: text attributes.
To use this tool, you can click on the canvas to add a auto-resizing text box and then type the text you want to add. The size of the text box will be automatically adjusted to fit the text content.
You can also click down on the canvas and then drag to add a text box with the specified size you want. Its size is fixed. You need to adjust its size manually.
Tips
You can change the auto-resizing attribute of a text box in the attributes panel at any time as you need.
To edit the texts of an existing text box, you can select it using the select and move tool and then double-click on it or press the enter key on your keyboard to start editing texts.
Tips
When editing texts, you can choose the Edit > Emoji & Symbols menu to open the emoji and symbol panel. Then you can double-click an emoji or symbol to insert it into the text box.
To end editing texts, you can press the Esc key on your keyboard or right-click on the canvas to show the context menu and then choose the End Editing menu.
You can also add curved texts. Please refer to Curved texts to know more about this.
Crop tool
This tool helps you to crop the the canvas image.
After choosing this tool, a default rectangle area will be added to the canvas. You can drag its control knobs to adjust the crop area.
To apply the crop, you can just double-click on the crop rectangle or click the enter key on your keyboard. You can also right-click on the canvas to show the context menu and then choose the Crop menu command.
Selection tool
This tool helps you to select some part of the image on the canvas. There are 4 selection tools:
Rectangle selection tool
You can use it just as the rectangle tool to select a rectangle area. This is the default and most commonly used selection tool.Elliptical selection tool You can use it just as the ellipse tool to select an elliptical area.
Lasso selection tool You can use it to select a free area as you want. Just click some point on the canvas and drag to select. Release your clicking to finish selecting.
Polygonal selection tool You can use it to select a free polygon area as you want.
You can choose one of them in 3 ways.
Choose a selection tool from the
Tool>Selectionmenu.Click the selection tool icon in the tools bar and keep pressing it to pop up the selection menu. You can release your pressing until choosing a selection tool.
This is the fastest way to choose a selection tool.Click the selection tool icon in the tools bar to select it. Then you can click the selection button in the attributes panel to choose a selection tool.
Tips
To select the whole image, you can choose the Edit > Select All menu in the top menu bar.
After selecting some area, you can edit the select area, including delete, cut, copy, rotate, flip, adjust opacity, invert colors, adjust colors, apply a filter and so on. You can refer to Edit image to know more about this.
Tips
After selecting some area on the canvas, you can press the shift key on your keyboard and then drag the selected area to move the selected image instead of the selection.
Magic selection tool
This tool also helps you to select some area on the canvas.
To use it, please click down at some point on the canvas and then drag to select an area which has the similar color with the clicked point. The more you drag, the more connected points will be selected.
After selecting some area, you can edit the select area, including delete, cut, copy, rotate, flip, adjust opacity, invert colors, adjust colors, apply a filter and so on. You can refer to Edit image to know more about this.
Tips
You can use this tool to select the image background and remove it. To do this, please just click down at some point on the image background and then drag to select all the area you want. Then you can press the delete key on your keyboard to delete it.
Select and move tool
This tool helps you to select some objects on the canvas. It is the most commonly used tool. It is different the rectangle selection tool which is used to select some area on the canvas. You can just use it as the rectangle selection tool and all objects inside the selected area will be selected.
Tips
To select more than one layer/object, you can also hold down the command or shift key on your keyboard and then click on the layers/objects you want to select.
Tips
To select all objects on the canvas, you can choose the Edit > Select All Objects menu in the top menu bar.
After select some objects, you can manage and edit them, including delete, cut, copy, rotate, resize, flip, align, distribute, group, ungroup, apply a filter and so on. You can refer to Manage and edit layers/objects to know more about this.