
Edit Image
You can edit the entire image or specific selections using commands from the Image and Object menus.
Delete
Select an area with a Selection Tool, then press the Delete key or choose Edit > Delete.
Copy
Select an area, then choose Edit > Copy or press Command + C.
Crop
Choose Image > Crop to activate the Crop Tool. Adjust the crop area, then double-click or press Return to apply.
Resize
Choose Image > Adjust Size… to resize the canvas or the image.
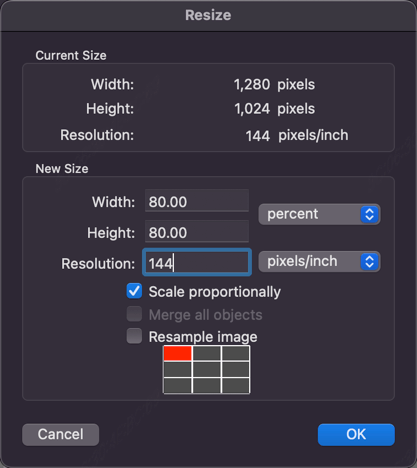
In this panel, you can adjust:
- Dimensions: Enter a new width and height. Available units include pixels, cm, mm, inches, and percent.
- Resolution: Adjust the image resolution (pixels per inch).
- Scale Proportionally: Keep this checked to maintain the original aspect ratio when changing dimensions.
- Merge All Objects: Flattens all layers into a single image during resizing. It is recommended to leave this unchecked to preserve editability.
- Resample Image: When checked, the image content is scaled to the new dimensions. When unchecked, only the canvas size changes, and you can choose how the existing image is anchored within the new canvas.
Adjust Opacity
Choose Image > Adjust Image Opacity… to change the transparency of the entire image. To adjust a specific area, select it first, then choose Object > Adjust Opacity….
Rotate
Choose Image > Rotate Canvas Left or Rotate Canvas Right to rotate the entire document. To rotate a specific element, select it and choose Object > Rotate and Resize….
Flip
Choose Image > Flip Canvas Horizontally or Flip Canvas Vertically. For specific elements, select them and use the Object menu.
Adjust Colors
Choose Image > Adjust Colors… to modify the entire image. For a specific area, select it and choose Object > Apply Effect > Adjust Colors….
Invert Colors
Choose Image > Invert Colors. For a specific area, select it and choose Object > Apply Effect > Invert Colors.
Apply Effects
Select an area (or choose Edit > Select All), then choose Object > Apply Effect to add filters and visual effects.
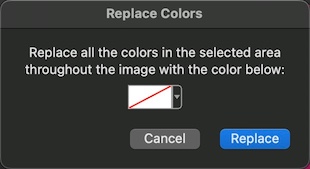
Replace Colors
Select an area, then choose Image > Replace Selected Colors…. A panel will appear allowing you to pick a target color and replace it throughout the selected area.
Tips
You can replace a solid background color with the transparent color to quickly remove a background.
Remove Background
Choose Image > Remove Background to automatically detect and remove the image background using AI. If the automatic removal cannot find a clear background, you can use the Magic Selection Tool to select and delete it manually.
Important
Requires macOS 14 (Sonoma) or later.
Tips
This command applies to the entire document. To remove the background of a specific layer, use Object > Remove Background.