
Open the App
After installing from the App Store, open the app from Launchpad or your Applications folder.
Tips
You can also drag an image or file directly onto the app icon in the Dock to open it.
Tips
To keep the app easily accessible, right-click its icon in the Dock and choose Options > Keep in Dock.
When you launch the app, you will see the menu bar and the Open panel.
Menu Bar

The menu bar provides access to all app features and commands.
App Menu
- About: View the app version and information.
- Settings…: Configure app preferences. See Settings.
- Upgrade to full-featured version: Upgrade to the full-featured version or check your license status.
- Quit: Exit the app.
File Menu
- Open…: Open an existing image. See Open File.
- Open Recent: Quickly open recently used files.
- New: Create a blank image. See Create New Image.
- New from Clipboard: Create an image from copied content.
- Save / Export…: Save your work. See Save and Export.
- Revert to Saved: Restore a previously saved version of your document.
- Duplicate: Create a copy of the current document.
- Close: Close the current document.
- Print…: Print your image. See Print.
Edit Menu
Standard editing commands including Undo, Redo, Cut, Copy, and Paste.
- Select All: Select the entire canvas.
- Select All Objects: Select all objects and layers.
- Paste Style: Apply the copied style (fill, stroke, shadow, etc.) to selected objects.
Tips
Cut, Copy, Paste, and Delete apply to selected objects. If no objects are selected, they apply to the selected canvas area.
Tool Menu
Select drawing and editing tools. Most tools support keyboard shortcuts. See Tools.
Image Menu
Commands in this menu apply to the entire image:
- Crop: Crop the canvas. See Crop Tool.
- Adjust Size…: Resize the image and adjust resolution. See Resize Image.
- Adjust Colors…: Modify image colors. See Adjust Colors.
- Invert Colors: Invert the colors of the image.
- Adjust Image Opacity…: Adjust the overall image opacity.
- Remove Background: Automatically remove the image background. See Remove Background.
- Rotate Canvas Left / Rotate Canvas Right: Rotate the canvas left or right by 90 degrees.
- Flip Canvas Horizontally / Flip Canvas Vertically: Flip the canvas horizontally or vertically.
Object Menu
Commands in this menu apply to selected objects or layers. Use these to manage, arrange, and edit specific elements on your canvas. See Manage Layers.
View Menu
Control your workspace and canvas display:
- Zoom: Zoom In, Zoom Out, Actual Size, or Zoom to Fit.
- Rulers: Show Ruler or hide canvas rulers, and change their Ruler Units or Ruler Start Point.
- Sidebar: Show or hide the layer list.
- Grid: Show Canvas Grid, hide, or Configure Canvas Grid….
Tips
If the grid is too fine, it may not display. Zoom in to see it.
Window Menu
Standard macOS window management commands.
Help Menu
- Export Favorite Colors… / Import Favorite Colors…: Sync your saved colors across devices.
- Contact Us: Get support via email.
- Home Page: Visit the app's website.
- Online Help: Open this user manual.
- FAQ: View frequently asked questions.
- Feedback issues...: Export app logs to help troubleshoot problems.
Open Panel
The Open panel appears when no documents are open.
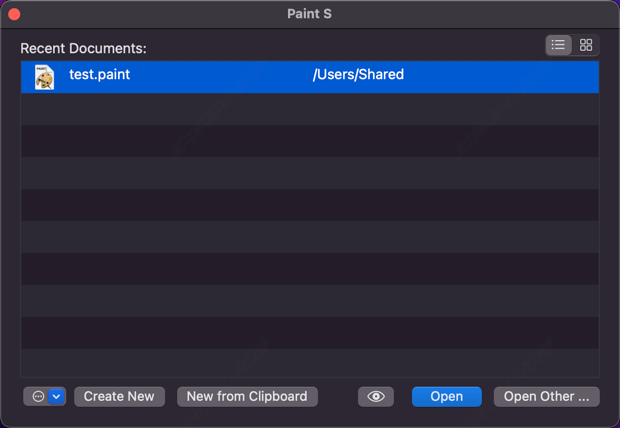
- Open Recent: Double-click a recent file to open it, or select it and press Return.
Tips
To change the number of recent items shown, adjust your macOS System Settings. See Apple Support.
- Open Other…: Browse your Mac to open an existing image.
- Create New: Start a new blank document.
- New from Clipboard: Create a document using an image currently copied to your clipboard.