Draw, sketch and edit your folder icon
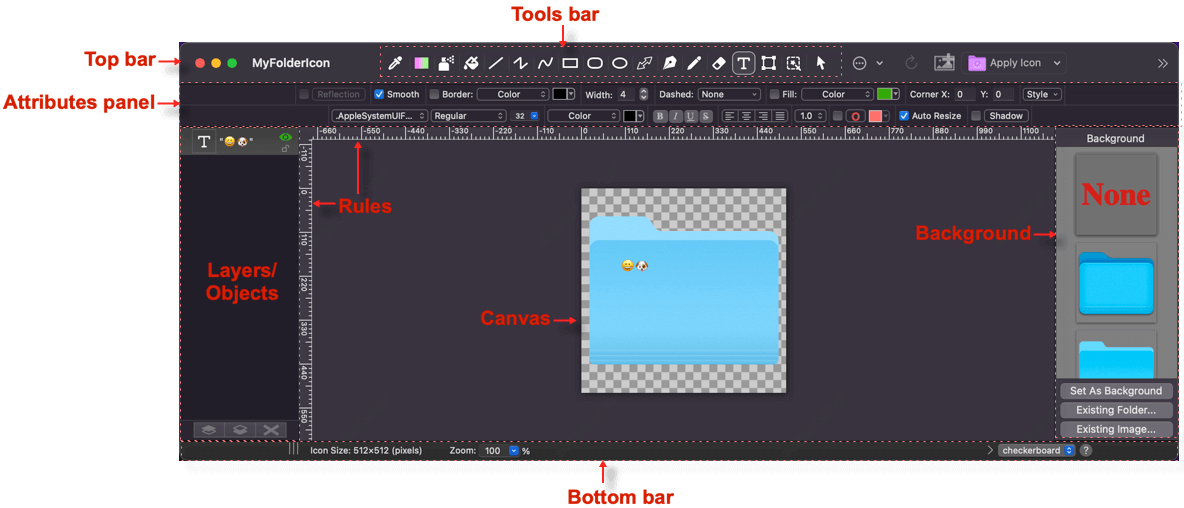
After opening an existing folder icon or creating a new empty folder icon, a window will show up automatically. You can draw, sketch, or edit your folder icon at here. The window is divided into several parts as shown in the screenshot below:
- The top bar on the top.
- The attributes panel below the toolbar.
- The layers/objects panel on the left.
- The canvas in the center includiging the rulers.
- The icon background panel on the right.
- The bottom bar on the bottom.
Top bar

The top bar contains the following parts as shown in the screenshot above:
The tools bar.
The tools bar is used to select the tool you want to use. You can choose one of them as you want. You can also choose a tool by choosing the corresponding menu commands from theToolmenu in the top menu bar. Besides, the menu commands support keyboard shortcuts.
To know more about all tools, please refer to Use tools.The edit button.
When you click this button, it will pop up a menu which has many regular edit commands which are available when you select some objects or some part on your imgage. The available commands automatically change based on the object you are currently selecting. These commands are also available in the top menu bar'sObjectmenu and most of them support keyboard shortcuts.The rotate & resize button.
This button is available when you select some objects or some part on your imgage. It allows you to rotate or resize your selected objects or icon part. The command is also available in the top menu bar'sObjectmenu and it supports keyboard shortcuts.The folder icon button.
You can click this button to pop up a menu which allows you to apply the current folder icon to a existing folder or create a new folder with it.The undo/redo control.
You can undo or redo your actions by clicking this control. It is also available by choosing theEdit>UndoorRedomenu in the top menu bar. Besides, the menu commands support keyboard shortcuts.The zoom control. You can zoom your icon in/out/to its actural size by clicking this control. They are also available by choosing the
View>Zoom In,Zoom Out,Actual SizeandZoom ot Fitmenu in the top menu bar. Besides, the menu commands support keyboard shortcuts.The icon size control.
You can change the size of your folder icon by clicking this control. A default size will be used. It is recommended that to use the default size.
Attributes panel

The attributes panel shows the attributes of your current selected tool or objects. The available attributes are different for different tools and objects. You can modify the attributes of your objects by modifying the attributes in this panel. To get more information about the attributes, please refer to Modify attributes.
Layers/Objects panel
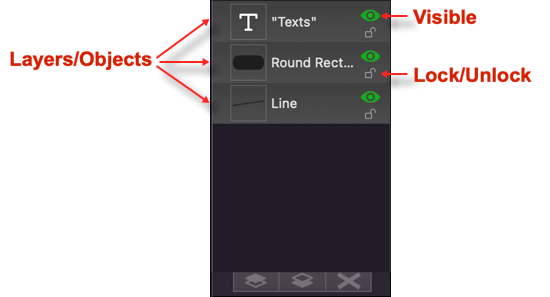
The layers/objects panel is on the left side of the window. It shows the layers/objects in your icon. You can select a layer or an object by clicking on it. The selected layers/objects will be highlighted. You can also manage your layers/objects at here, includiging delete, merge, unmerge, arrange, rename, lock, toggle visible etc. To know more about how to manage your layers/objects, please refer to Manage and edit layers/objects.
Canvas
The canvas is in the center of the window. It includes the rulers and the icon canvas where you can draw and sketch.
You can change the ruler unit by choosing the View > Ruler Units menu.
You can change the origin of the rulers by choosing the View > Ruler Start Point menu.
You can also show or hide the canvas grid by choosing the View > Show Canvas Grid menu. To configure the canvas grid, please choose the View > Configure Canvas Grid menu.
Icon background panel
The icon background panel is on the right side of the window. It allows you to change the background of your icon. You can double-click one of build-in folder background images to use it.
You can also click the Existing Folder... button to select an existing folder and use its icon as the background.
You can also click the Existing Image... button to select an existing image and use it as the background.
Bottom bar

The bottom bar contains the following parts:
Icon size.
It show the current size of your canvas/icon. The unit is the same as the ruler unit.Zoom.
It shows the current zoom level of your icon. You can zoom in/out by choosing an item from its pop-up menu.Cursor position in your icon.
It shows the current cursor position in your icon. The unit is the same as the ruler unit.Canvas background.
It allows you to change the background of your canvas. There are two types of canvas background: checkerboard and solid color. You can choose one of them by choosing an item from its pop-up menu. The default is checkerboard.Tips
You should note that the canvas background just represents the background of the canvas. It does not affect the background of your icon. In other works, it won't appear in your icon. It is only used to help you to see the transparent part of your icon. If your icon is not transparent, you won't see the canvas background. If there are transparent parts in your icon, you will see the canvas background in those parts.